Welcome, DIY enthusiasts! If you’re looking to grow plants at home without soil, hydroponics is a great option. It uses nutrient-rich water solutions and can be done in small spaces. One key component for success is LED grow lights, which provide the essential light spectrum for plant growth. These lights are energy-efficient and have a long lifespan.
In this guide, we’ll show you how to set up your own home hydroponic system with LED grow lights. Whether you’re experienced or a beginner, you’ll find all the information you need to get started. Let’s dive into the world of hydroponics and enjoy growing your own fresh produce at home!
What is a Hydroponic System?
A hydroponic system is a method of growing plants without soil, using a nutrient-rich water solution instead. This innovative technique allows plants to absorb essential nutrients directly from the water, promoting faster growth and higher yields compared to traditional soil-based gardening. Here are some key points about hydroponic systems:
Definition and Principles:
- Definition: Hydroponics involves growing plants in a controlled environment where their roots are submerged in a nutrient solution. The solution provides all the necessary elements for plant growth, including water, minerals, and oxygen.
- Principles: The principle behind hydroponics is that plants can grow healthily as long as their roots have access to the correct balance of nutrients, water, and oxygen. The absence of soil eliminates common soil-borne diseases and pests.
Common Types of Hydroponic Systems:
- Deep Water Culture (DWC): Plants are suspended with their roots in nutrient-rich water. An air pump provides oxygen to the roots.
- Recirculating Deep Water Culture (RDWC): It’s an enhanced version of DWC. In this system, the nutrient solution is continuously circulated through a pump that pushes the solution from a reservoir to the plant roots and then back to the reservoir.
- Nutrient Film Technique (NFT): A thin film of nutrient solution flows over the roots, which are exposed on a shallow bed or trough.
- Drip System: Nutrient solution is dripped onto the base of the plant at regular intervals, allowing excess solution to drain away.
- Ebb and Flow (Flood and Drain): The grow bed is periodically flooded with nutrient solution and then drained, allowing the roots to be exposed to air during the draining cycle.
- Aeroponics: Plant roots are suspended in the air and misted with a nutrient solution at regular intervals.

Are you confused with DWC and RDWC?
-
Advantages:
- Easy to set up and maintain
- Lower initial cost
- Suitable for beginners
-
Disadvantages:
- Potential oxygen supply issues
- Less frequent nutrient solution updates compared to RDWC
-
Advantages:
- Better oxygen supply due to continuous circulation
- Reduced dead spots in the nutrient solution, lowering the risk of root diseases
- More precise nutrient control
-
Disadvantages:
- Higher initial setup cost
- Requires an additional pump and piping
- More complex maintenance
- Nutrient Solution Circulation: In DWC, the nutrient solution is usually static, while in RDWC, it is continuously circulated.
- Oxygen Supply: RDWC generally provides better oxygen supply due to the circulation of the nutrient solution.
- Complexity: RDWC systems are slightly more complex than DWC systems and require additional equipment for the nutrient solution circulation.
- DWC: Ideal for home growers, small-scale commercial operations, and educational purposes.
- RDWC: Suitable for large-scale commercial grows where efficient oxygen supply and nutrient control are essential.
Both DWC and RDWC are effective hydroponic methods. The choice between them depends on specific growing needs, budget, and familiarity with the system. For beginners, DWC might be a better starting point, while those seeking higher efficiency and control may prefer RDWC.

Advantages of Hydroponic Systems:
- Space Efficiency: Hydroponic systems can be set up vertically or in compact configurations, making them ideal for urban environments.
- Water Efficiency: These systems use up to 90% less water than traditional soil-based gardening because the water is recirculated.
- Faster Growth: Plants often grow faster and produce higher yields due to direct nutrient absorption.
- Reduced Pest and Disease: Without soil, many common pests and diseases are eliminated, reducing the need for pesticides.
Understanding these basics will help you choose the right type of hydroponic system for your needs and set the foundation for a successful DIY hydroponic garden. In the next section, we’ll delve into the role of LED grow lights in enhancing your hydroponic setup.
LED Grow Light
An LED grow light is a specialized lighting device designed to emit light in the wavelengths most beneficial for plant growth. Unlike traditional lighting options like incandescent or fluorescent bulbs, LED grow lights are energy-efficient and have a longer lifespan.
How LED Grow Lights Work
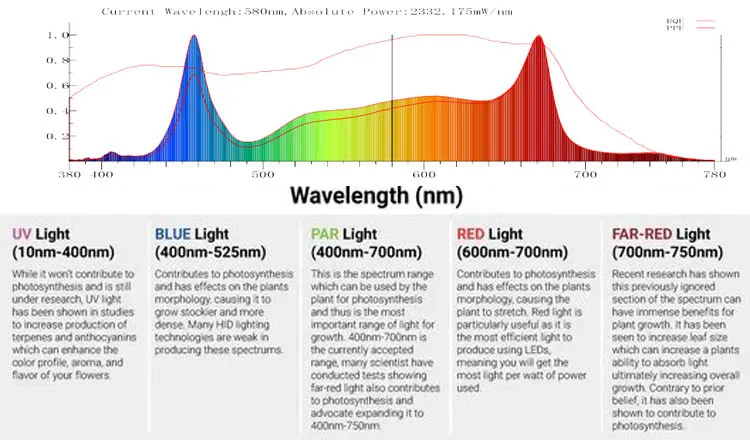
LED grow lights work by converting electrical energy into photons, which are units of light. These photons are emitted at specific wavelengths that correspond to the different stages of plant growth:
- Blue Light: Promotes vegetative growth and strong root development. It influences chlorophyll absorption and helps in leaf expansion.
- Red Light: Stimulates flowering and fruiting. It enhances photosynthesis and supports overall plant health during the bloom phase.
- White Light: Mimics natural sunlight and supports overall plant health. It provides a balanced spectrum that benefits plants at all stages of growth.
- Ultraviolet (UV) Light: Some advanced LED grow lights include UV light, which can help control plant diseases and pests. UV light has germicidal properties, reducing the risk of mold and mildew. However, it should be used cautiously as excessive UV exposure can harm plants.
- Infrared (IR) Light: Infrared light penetrates deeper into the plant canopy, promoting photosynthesis and enhancing plant metabolism. IR light is particularly beneficial for improving plant vigor and increasing yields. It also helps in reducing plant stress during high-light conditions.
Integration of Spectrums
Now LED grow lights often combine these different wavelengths to create a full-spectrum light source. This allows growers to tailor the light output to the specific needs of their plants throughout their growth cycle. For example:
- Vegetative Stage: A mix of blue and white light promotes robust leaf and stem growth.
- Flowering Stage: A combination of red, white, and sometimes IR light enhances flowering and fruiting.
- Germination: Some growers use UV light to sterilize growing media and reduce the risk of pathogens.
By understanding and utilizing these different wavelengths, growers can optimize their indoor gardening setups for maximum efficiency and yield.
We have 2-way / 3-way spectrums grow lights. Growers can adjust spectrum as plants needs in different growth stages. If you are professional, it will be a ideal choice. 3-way dimming led grow lights
Types of LED Grow Lights
There are several types of LED grow lights, each suited for different applications:
- Full Spectrum LED Grow Lights: Emit a wide range of wavelengths, mimicking natural sunlight and suitable for all stages of plant growth.
- Spectrum-Specific LED Grow Lights: Target specific wavelengths to optimize certain stages of plant growth, such as blue for vegetative growth and red for flowering.
Benefits of LED Grow Lights
- Energy Efficiency: LED grow lights consume significantly less power compared to traditional lighting systems, making them cost-effective in the long run.
- Longevity: With a lifespan of up to 50,000 hours, LED grow lights last much longer than other lighting options.
- Low Heat Emission: LED grow lights produce minimal heat, reducing the risk of overheating plants and allowing for closer placement to the plants.
- Customizable Light Spectrums: Many LED grow lights offer adjustable spectrums, allowing growers to tailor the light output to the specific needs of their plants.
- Environmentally Friendly: LED grow lights do not contain hazardous materials like mercury, making them safer for both users and the environment.
Considerations When Choosing LED Grow Lights
- Light Intensity: Ensure the light intensity matches the requirements of your plants.
- Coverage Area: Select a light that covers the appropriate area for your growing space.
- Energy Consumption: Check the wattage to ensure it fits within your energy budget.
- Adjustability: Look for lights with adjustable mounts or hanging options for flexibility.
Preparation: Setting Up Your Hydroponic System with LED Grow Lights
Before diving into the setup of your hydroponic system, it’s essential to gather all necessary materials and tools. Proper preparation ensures a smooth and efficient assembly process. Here’s a comprehensive guide to help you get started:
Materials and Tools List:
- Hydroponic Container: Choose a suitable container such as a plastic bucket, glass tank, or specialized hydroponic grow tray. Ensure it is clean and free from any leaks.
- Water Pump and Air Pump: These are crucial for circulating the nutrient solution and providing oxygen to the roots.
- Nutrient Solution: Purchase a high-quality nutrient solution tailored for hydroponic systems. Follow the instructions for mixing.
- LED Grow Lights: Select appropriate LED grow lights based on your plant requirements and growing area. Full-spectrum or spectrum-specific lights are recommended.
- Timer: A timer will help automate the light cycles, ensuring consistent lighting schedules.
- pH Test Kit: Maintaining the correct pH level is vital for nutrient absorption. A digital pH meter or test kit is ideal.
- Thermometer: Monitor the temperature of both the nutrient solution and the growing environment to keep them within optimal ranges.
- Plant Medium: Depending on your hydroponic system, you may need a medium like rock wool cubes, clay pebbles, or net pots filled with a soilless mix.
- Additional Tools: Basic tools such as grow tent, ducting fan,scissors, and a marker for labeling can be helpful during setup.
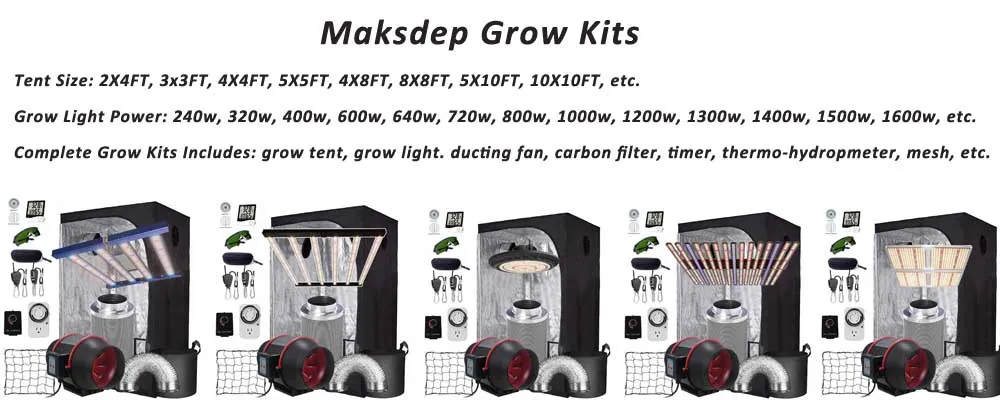
Some store offers complete grow kits, it will be very convenient for new growers.
We also can provide one-stop purchasing. We have helped many customers received their desired hydroponic systems with our led grow lights. If you need, please feel free to contact us : Maksdep One-Stop Horticulture Equipments.
Step-by-Step Preparation Guide
Step 1: Assemble the Container
- Clean the Container: Thoroughly clean and dry the container to prevent contamination.
- Install the Water Pump and Air Pump: Place the water pump at the bottom of the container to ensure continuous circulation. Attach the air pump and air stones to provide adequate oxygen to the roots.
Step 2: Add Nutrient Solution
- Mix the Nutrient Solution: Follow the instructions on the nutrient solution package to prepare the mixture. Use distilled or reverse osmosis water for best results.
- Check and Adjust pH: Use the pH test kit to measure the pH of the nutrient solution. Adjust it to the optimal range (usually between 5.5 and 6.5) using pH up or down solutions.
Step 3: Install the LED Grow Lights
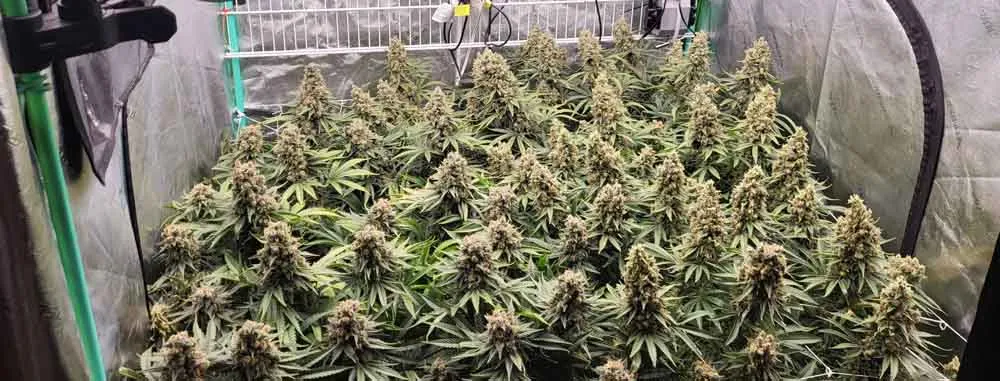
- Determine Light Position: Place the LED grow lights above the plants to ensure even coverage. The distance will depend on the light intensity and plant type, typically ranging from 12 to 36 inches.
- Connect the Timer: Plug the LED grow lights into the timer and set it according to the recommended light cycle for your plants (usually 12-16 hours per day for most plants).
Step 4: Planting
- Choose Suitable Seeds or Seedlings: Select seeds or seedlings that are compatible with hydroponic systems.
- Prepare the Plant Medium: Secure seeds or seedlings in an appropriate medium like rock wool cubes or net pots filled with a soilless mix.
- Place the Medium into Nutrient Solution: Submerge the medium in the nutrient solution, ensuring that the roots have access to water and nutrients.
By following these preparation steps, you’ll create a solid foundation for your hydroponic system. The next sections will cover setting up the system, maintaining it, and addressing common issues to ensure a successful and rewarding growing experience.
Maintenance and Management of Your Hydroponic System with LED Grow Lights
Maintaining your hydroponic system is crucial for ensuring healthy plant growth and maximizing yields. Proper management includes regular monitoring, cleaning, and troubleshooting. Here’s a comprehensive guide to help you keep your system running smoothly:
Daily Maintenance
- Check Water Levels: Ensure the nutrient solution level is adequate. Refill with water as needed, maintaining the correct nutrient concentration.
- Monitor pH and Temperature: Use your pH test kit and thermometer daily to check the nutrient solution’s pH and temperature. Adjust the pH if necessary (between 5.5 and 6.5) and ensure the temperature stays within the optimal range (usually between 65-75°F).
- Inspect Plant Health: Look for signs of nutrient deficiencies, pests, or diseases. Healthy plants should have vibrant green leaves and strong stems.
- Clean the System: Wipe down the inside of the container and remove any algae buildup on surfaces exposed to light. Clean the water pump and air stones regularly to prevent clogging.
Weekly Maintenance
- Change Nutrient Solution: Depending on the size of your system and plant type, change the nutrient solution every 1-2 weeks. This helps prevent nutrient imbalances and root disease.
- Check LED Grow Lights: Inspect the LED grow lights for dust accumulation and clean them if necessary. Ensure they are functioning correctly and providing the required light intensity.
- Examine Roots: Check the roots for signs of rot or disease. Healthy roots should be white and firm. If you notice brown or mushy roots, it may indicate poor oxygenation or nutrient imbalance.
Monthly Maintenance
- System Check: Conduct a thorough inspection of the entire system. Check for leaks, worn-out components, and ensure all connections are secure.
- Replace Air Filters: If your air pump has filters, replace them monthly to ensure optimal performance.
- Calibrate Equipment: Recalibrate the pH meter and thermometer as needed to maintain accuracy.
Troubleshooting Common Issues
- Nutrient Deficiencies: If plants show yellowing leaves or stunted growth, adjust the nutrient solution’s composition. Add the appropriate nutrients based on deficiency symptoms (e.g., nitrogen, phosphorus, potassium).
- Algae Growth: Algae can thrive in nutrient-rich solutions exposed to light. Control algae by covering the container, reducing light exposure, and using an algae inhibitor if necessary.
- pH Fluctuations: If the pH levels fluctuate frequently, check for contamination in the water source or improper mixing of nutrients. Consistent monitoring and adjustments will help stabilize pH.
- LED Light Issues: If LED lights fail or dim, check the power connections and replace faulty parts. Dust and debris can also affect light output, so keep them clean.
By following these maintenance and management practices, you’ll ensure your hydroponic system remains efficient and productive. The next sections will cover common questions about hydroponics and LED grow lights, providing additional insights and tips for successful indoor gardening.
Hydroponics combined with LED grow lights offers an innovative and efficient way to grow plants indoors. This method not only maximizes yield and optimizes growth but also conserves resources and minimizes environmental impact. Whether you’re a novice gardener or an experienced horticulturist, the knowledge and techniques shared in this guide will help you achieve successful and rewarding results.